1.4 Counting Steps
-
We often use computers to track a piece of information that increases or decreases when actions occur.
Some examples are the odometer in a car that counts how many kilometres you’ve travelled, the counter on a stopwatch that counts how much time has passed, or the light level of a room (which we tracked in the previous lesson).
When a computer needs to keep track of changing information, we call it a variable. We’re going to use variables together with another one of the micro:bit’s sensors to build our very own step tracker.
-

Variables are way for our program to remember pieces of information that we can either recall later, or change over time. We can use a variable to store a number, like the number of steps that our micro:bit has detected.
We can find variables in the Variables menu in MakeCode. We can Make a Variable and give it a name. It's a good idea to choose a name that describes what the variable is for. In this instance, we're going to use the variable to store the number of steps we've taken, so we'll call it steps.
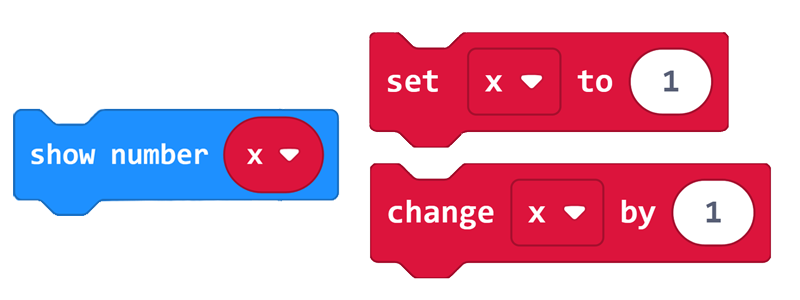
We can use a Variable block like this to:
- check or show the current number stored in the variable.
- set the variable to a particular number. This is useful if you want to reset the variable.
- change the number stored by increasing or decreasing the current number.
-
The Challenge
- When you press the A button, the variable will increase.
- When you press the B button, the variable will decrease.
- The variable will be shown on the display.
Required Device
- 1 micro:bit
Suggested Blocks
- show number
- forever
- on button pressed
- [variable name]
- change [variable name]
Bonus Challenge
- Add a new feature to your counter so that when you press the A+B buttons together your variable is reset to zero. You will need the set [variable name] block for this.
-

Did you know that your micro:bit can detect movement? It does this with a special chip on board called an accelerometer. This little chip uses a microscopic weight that moves in tiny amounts when you move your device. That tiny movement gets turned into an electrical signal that your micro:bit can measure.
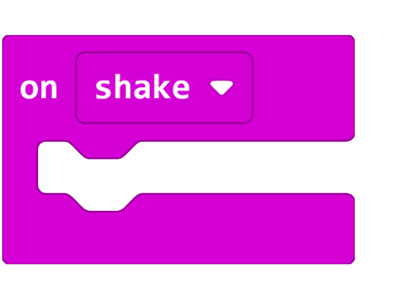
We can use the accelerometer to trigger actions in our code with the on shake block.
Here are some tips for using the on shake block:
- You can find the on shake block in the Input menu in MakeCode.
- This code block is set up by default to use the accelerometer to detect when the micro:bit is shaken.
- We can change shake to detect other kinds of behaviour, like tilts or falls. Although this block can do other things, we'll continue to refer to it as
on shake.
-
The Challenge
When you shake your micro:bit, the word "Hello!" will show on the display.
Required Device
- 1 micro:bit
Suggested Blocks
- show string
- on shake
Bonus Challenges
- Can you program your micro:bit to initiate a countdown or a timer when it is shaken?
-
The Challenge
When you tilt your micro:bit, an arrow is shown on the display, pointing in the tilted direction.
Required Device
- 1 micro:bit
Suggested Blocks
- show leds
- on shake
Hints
- Make sure that the arrow shown on the display changes for each direction, so you can be sure that your code is working.
Bonus Challenge
- Can you create a new program that displays a smiley face icon when the micro:bit logo is facing upwards and a frowny face icon when the micro:bit logo is facing downwards?
-
To complete the next challenge, we are going to power the micro:bit from a battery pack so we don’t need to be plugged into a computer. The battery pack can power the micro:bit when the USB cable is unplugged, which means it can become a portable or wearable device! You can carry it in your pocket, use a band to strap it to your wrist or tie it into your shoelaces if you like!
When you are using the battery pack, keep in mind that you should only have one power source plugged into the micro:bit at a time.
This means that if you need to download your code or connect your micro:bit to the computer, then you should unplug the battery pack.
The battery pack can interfere with the USB connection when it’s plugged in and can prevent you from downloading code properly.
Plug the battery in when you have disconnected the micro:bit from the computer and you’re walking away to test something.
-
The Challenge
- When you walk around the room with the micro:bit, it will count your steps by increasing a variable.
- When you press the A button the micro:bit shows the number of steps you've taken on the display.
- After showing the number of steps the display clears itself automatically.
- When you press the B button, the micro:bit resets the number of steps to zero.
Required Devices
- 1 micro:bit
- 1 battery pack
Suggested Blocks
- show number
- clear screen
- on shake
- on button pressed
- [variable name]
- set [variable name]
- change [variable name]
Bonus Challenges
- Can you make your step counter work in reverse? Instead of counting upwards, start your variable at 100 and count down to zero. When your steps reach zero, play a sound and an animation to celebrate reaching your target!
-
Using the code you wrote for Challenge 4, plug your micro:bit into the battery pack and take it for a walk. Walking around the classroom is enough for this activity, but, if it’s okay with your teacher, you can also take the micro:bit outside.
While you walk with your step counter, try counting steps in your head or out loud as well. Some things to test might be:
- Is the micro:bit counting your steps accurately?
- Can you change how accurate the step counter is by changing how you hold it? For example, is there a difference between holding it in your hand, tying it in your shoelaces, or putting it in your pocket?
When you’re done, compare your results with your classmates.
-
Now that you've finished this lesson, you should know how to use the micro:bit accelerometer, and how to use Variables in your code.
In our final lesson for this module, we'll learn how to use the micro:bit radio to send messages from one micro:bit to another.